Wednesday, August 29, 2012

Homemade Hand Scrub


Ladies,

How many of you use Mary Kay or Bath & Body Hand scrub? I know I do (I mean .. I did). Going thru all the pins on Pinterest I found a ton of homemade sugar scrubs... all of which needed about 4 or more ingredients. I love to make things but these days I don’t like to spend a lot of time or money for them ;) Well, I was in luck... I happened to stumble on this pin for homemade sugar hand scrub that only included 2... Yes I said 2... Ingredients.

http://pinterest.com/pin/108438303498649493/

It said it was just like Mary Kay hand scrub... well I am a bit of a pessimist, so I did not totally believe it. I went to the local store and bought the 2 ingredients... Dawn soap (with Oil of Olay) and sugar. Found some jars I had here at home and embarked on a journey that I was sure was due failure.

Let’s just say I was pleasantly surprised.... it works and it works great! I made some for my mom, her friend and some of my friends in the moms group. Everyone that uses it loves it. I added a cute little saying on the top and a ribbon to add the "Tina Touch". By time I was done it cost about $3 for 8oz of it... that is far cheaper than any Mary Kay I have ever bought.

So if you are looking for an inexpensive gift for a lady in your life, this one is a HIT !!!

P.S. - I do know a couple of men who have used this as well.. its great for removing grease and grime.


Teacher Gifts from Pinterest


The first day of school was quickly approaching and my mind was racing... what to make the new teacher. What better way to get the creative juices flowing then to log into Pinterest...I hit the jack pot, I found this tutorial on how to make these cute little Post-It note pad holders.

I had these cute little gifts ready for Josh's teacher... then we went to Meet the Teacher Day... Let’s just say that Mr. Powers isn’t the crafty type. The remaining Teacher gifts this year will be more male focused.


Here is the link to the tutorial on Pinterest... Gotta give credit where credit is due :) This is the link to my Pinterest but in the top right corner it will take you to the original post.


http://pinterest.com/pin/108438303498642729/

Halloween Toppers


Hi!

Like I said earlier, we have recently moved to Florida. If anyone is from Florida or been to Florida in the summer you will know that people generally spend the summer inside. This is great if you have lived here for a while, but when you are new to the area and want to meet people... not so much. The way we overcame this was to find and join some meet-up groups.

We found some... joined some... and meet some great people. Why am I telling you this, well because one of the groups is a Moms group and one of the things we do is have MNI (Mom's Night In). I Love to host and plan parties; so I decided to host a MNI where we make some Halloween Toppers for our kid’s class.

I know this sounds like a lot of babbling but I just wanted to give you all a heads up on why I am posting Halloween Toppers in August :)

Now to the Halloween Toppers...

BOO & Witch Way to the Candy Halloween Toppers


Here are the basic steps:

BOO

1 Cut black base cardstock to 4 1/4 x 5

2. Score the base at 2 1/2 giving you a 2 1/2 x 4 1/4 card

3. Cut strips of white cardstock in various widths... I uses approx. 1/4 inch plus or minus a bit

4. On the computer type the word BOO and print out

5. Glue the white strips of paper in random patterns

6. Ink the edge of BOO with a grey ink

7. Add googley eyes

8. Add a cute sentiment on the back


Witch Way to the Candy

1. Cut base cardstock to 4 1/4 x 5 (I used a Green I had)

2. Score the base at 2 1/2 giving you a 2 1/2 x 4 1/4 card

3. Cut out the Witch boots 2" from the Happy Hauntings Cricut Cartridge

4. On the computer type the words "Witch way to the CANDY" and print out (I used CK Fonts)

5. Adhere one boot on the base

6. Using Pop Dots, adhere the 2nd boot

7. Use liquid glaze on the black part of the boots

8. Ink the edge of Witch way to the Candy with an ink that matches your boots

9. Add a cute sentiment on the back


I then used some Halloween Bags I had from Target last year and filled with candy then folded over and stapled to the toppers.


Back to School

Good Morning Everyone,

Sorry for the big gap in posts... as some of you know we have recently moved from Michigan to Florida and with all the packing..moving.. and unpacking I have to say that I neglected my blog.

Worry no more, I am back ;)

Currently I am a SAHM... and LOVING it... so I have the ability to craft all day :)

Down here school starts in August, so I have had school on the brain. I wanted to send a cute little something to my friends kids back home. Seeing these cute paper bag card/envelope ideas on Pinterest (yes I am addicted) my creative juices started flowing. I made 2 iterations of these.. one for teenage girls and one for pre-teen boys.

Teenage Girl ones:
 
Here are the basic steps:
 
1. Take the 5x7 paper bag fold it almost in half
2. Found some cute pattern paper and cut it to fit the front of the envelope
3. Inked the edges to match the color combo
4. Sewed the edges of both the pattern paper and the paper bag (no glue.. it will mess up your machine)
4. Then I cut some white and corresponding card stock, added a ribbon and left a cute sentiment for the girls.
5. Found a ribbon that matched and tied it around the whole card/envelope
6. I added some of the cute litte magnetic clothespins I make (See earlier post under Teacher Appreciation gifts)
7. Lastly I added some cute little notepad and a pencil that I found at my local Walmart.
 
Pre-Teen Boys:
 
 
For the pre-teen ones,  I made them the same with the exception of the sewing; I only glued the edges... and then stapled a cute ribbon to the edge to make sure they did not come unglued.
 
Hope you like them.... the kids who received them did :)
 

Monday, April 30, 2012

Cute Teacher Gifts

Hello again !!

While sitting at an assembly at my sons school, I ran into one of the teacher and saw this cute bookmark... so I decided I was going to "Craft Lift" and make it myself... but improve it. Instead of using stamps I used cricut cuts from Doodlecharm , Locker Talk and CTMH Art Philosophy, a 4" paperclip and some magnetic close pins from Office max. Added a bit of Ribbon... and viola... cute teacher bookmarks and magnetic clips.

P.S.  Josh's teacher LOVED these too..


Teachers Appreciation Gift

Good Morning,

While I was at Cropping Daze Scrapbooking Retreat in Chesaning Michigan having a WONDERFUL weekend with my peeps.. we were listening to the radio and heard that Teachers Appreciation week is coming.. wanting to see when exactly it was, I googled it and found out that Teacher's Appreciation week is May 7th - May 11th, so when I needed a break from doing my layouts and wanted to just create something fun and new, I decided to create a little gift for my sons teacher. I used the CTMH Art Philosophy Cartridge and created some pretty flowers with dum dum suckers as the centers. I took the cute little flower pots that I found  at the store and painted the with Chalkboard paint, added the flowers and some floral stuff in the pot. Topping it off with some cute ruler ribbon along the edge. Once at home my son and I used chalk to add a cute little note for her.

When I dropped him off at school this morning, we gave it to her and she LOVED it... hopefully you will too.


Red Hatters Special Name Badges

Hi !

I received a call from a friend of my moms who is a Red Hatter... she wanted to have some special badges made for each of her Chaperetts. I used my CTMH Art Philosophy Cartridge and my Gypsy to create their custom badges. I added a special touch with a bit of bling and to make it a true Red Hatter item, I added a fun purple feather. Just got word.. they LOVE them.

Saturday, April 7, 2012

Some Pretty Flowers for Mom !!

A big shout out to all the Mom's who read my blog .... With Mother's Day approaching fast I wanted to make something that a Mom could receive and smile every time she looks at it. What do most if not all women like, other than bling, flowers. Using the CTMH Art Philosophy Cricut Cartridge I cut out one of the flowers and added some bling..used a pen as the stem and "planted" it in the a cute little metal bucket I found in the dollar section of Target.


Wine Anyone ??

Good Evening,

Well the Easter Bunnies and Chicks have been a very big success. As the Easter Bunnies and Chicks were flying out of my scrapbook room like hotcakes...a good friend and a new proud owner of a Easter Bunnie and Chick called me and told me she was Scrap-Aiding me ... and asked if I could make a wine box that matched the Easter Bunnie. So thats exactly what I did using the same template from My Scrap Chick. Take a look and tell me what you think. I think the this is a whole way to hand out wine bottles.

Monday, March 19, 2012

Easter's On Its Way

Hi everyone!

Looking at the calendar the other day I realized that Easter was only a few weeks away and I hadn't started and Easter crafts. I looked thru all my cricut cartridges and did not find anything that jumped out at me to make for Josh's teacher so I went to the web. Let me tell you... I found some awesome stuff. My favorite was this web-site My Scrap Chick. I fell in love with  a few of their templates. Using a template that I purchased from them I was able to cut out these adorable little Easter boxes. Take a look, I am sure you will fall in love with them too.


And if that wasn't enough, I had to make more stuff ! While we were walking thru IKEA we saw these cute little jars..so of course my first question to Dave was "what can I do with these?" We bought a pack and back to the cricut I went. Using the same same templates I decorated up a couple of them. Take a look.


Sunday, January 29, 2012

Gift Card Holder - Birthday Card

Happy Birthday to you!

Today Josh went to a Birthday Party for one of his classmates, which so happened to be a girl. Now I don't really know what to buy for a little girl so I took the safe route....you know it....gift cards! To make sure the "wrapping" was dolled up a bit; I pulled out my Gypsy and started to play. What I ended up with was this so very cute cupcake card meant to hold gift cards. Josh did tell me that she was not a real girlie-girl, but I think that every girl, girlie-girl or not, loves a bit of sparkle and bling.

To recreate this card you will need the following cartridges and accents:

CTMH Art Philosophy Cartridge - Used for the big tag card
Straight From the Nest Cricut Cartridge - Used to create the cupcake and Happy Birthday saying
Liquid Glass - Used to make the cherry glossy
Stickles - Used to add sparkle
Large Brad (or ribbon) - Used in the hole in the top of the tag, you can use ribbon if you prefer.


Teacher's Valentines Card

Hello again,

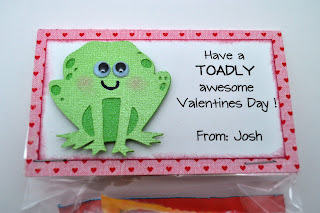
 A Valentine’s Day gift for Josh's teacher is just not complete without a card. To continue with the same theme of the goodie bag I made this cute little toad card. I used the CTMH Art Philosophy Cartridge to make the circle scallop card and once again used the Cricut Lite Live Simply Cartridge. Not to play on words but I do think that Josh and his whole class, including his teacher, will have a TOADLY awesome Valentine’s Day!

Tuesday, January 24, 2012

Valentines Day Treat Bags

Hi Eveyone!

With Valentines Day just around the corner, I figured I better get my going on a Valentines Day exchange for my son's school party. Every year we go to the store early (to get the best selection) and look through all the boxed Valentines so that  Josh can pick one out, but it never fails that the closer it gets to Valentines Day he wants a different one. So this year I decided that I was going to just incorporate his Valentines Day card with the bag full of goodies. To my surprise he was pretty ok with it, when we filled the bag with all the candy he actually said "THATS COOL MOM !"

For the cute little toad I used the Cricut Lite Live Simply Cartridge and added some googly eyes for dimension , poppin it up on a the saying that I printed from my computer. Then attached that to a piece of making memories heart paper that I had pre-scored in half. Using that as my tag, I stapled it to a Wilton's treat bag filled with candy. VIOLA... a "COOL" Valentines treat for Josh to hand out at school on Valentines Day.